FortiGate SSL VPN v5.4
This will review setting up remote users to access your network using a SSL VPN connection, either by tunnel mode (FortiClient) or with a web browser.
For this example we’re using tunnel mode instead of split tunnel. This means all traffic (including Internet traffic) will go through the firewall, allowing the client to be protected by the firewalls security features.
This example will authenticate with local user accounts.
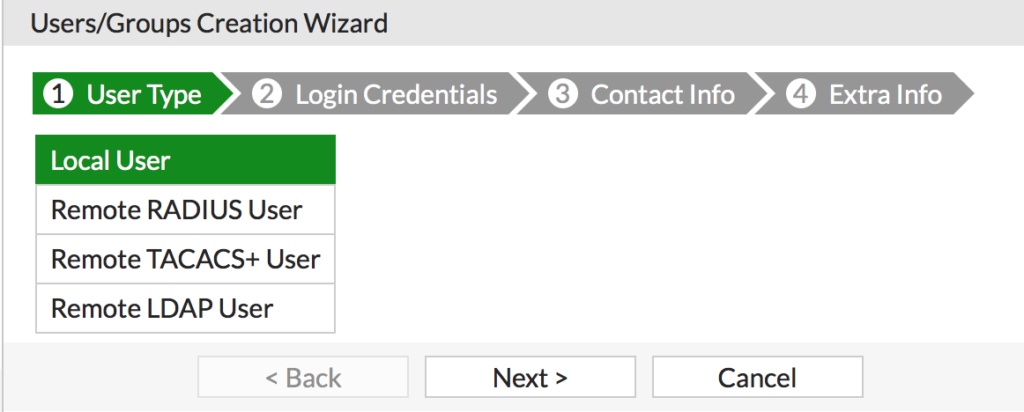
Step 1: Create a local user
- On your FortiGate go to User & Device –> User Definition
- Click Create New
- Select Local User and click Next
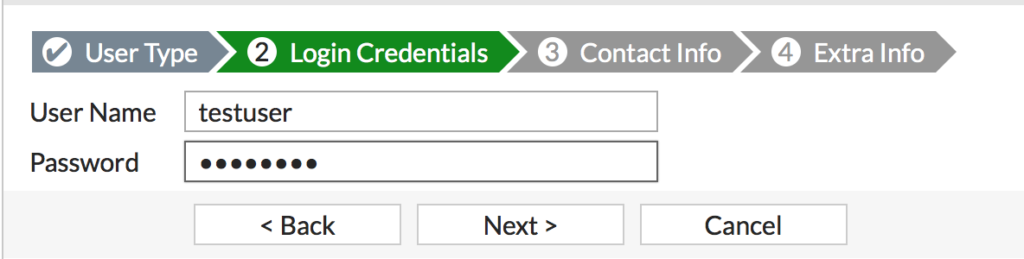
- Enter a unique username and password and click next
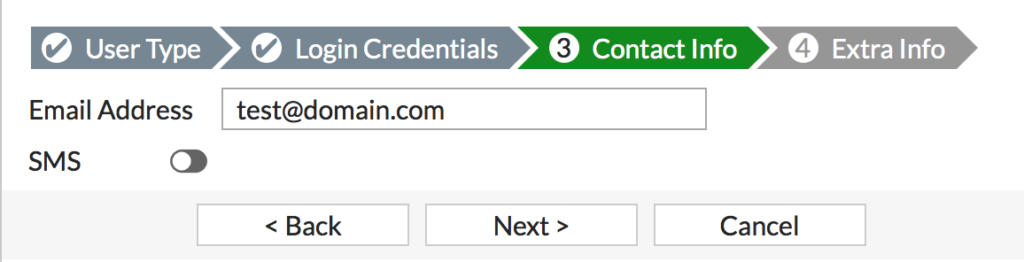
- Enter an email address (optional) and click Next
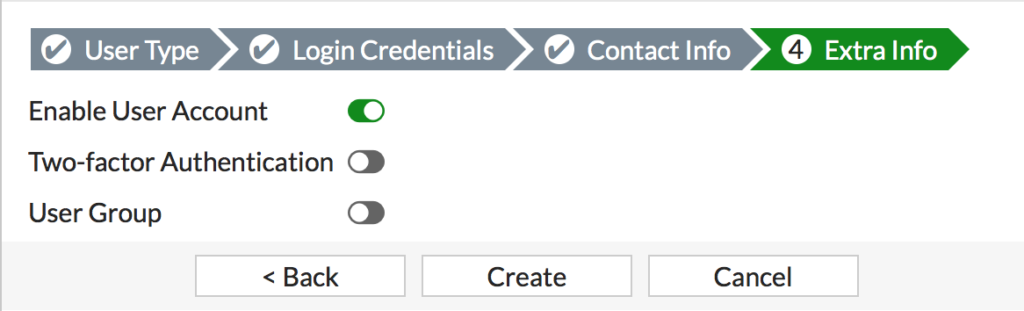
- Enable user Account and click Create
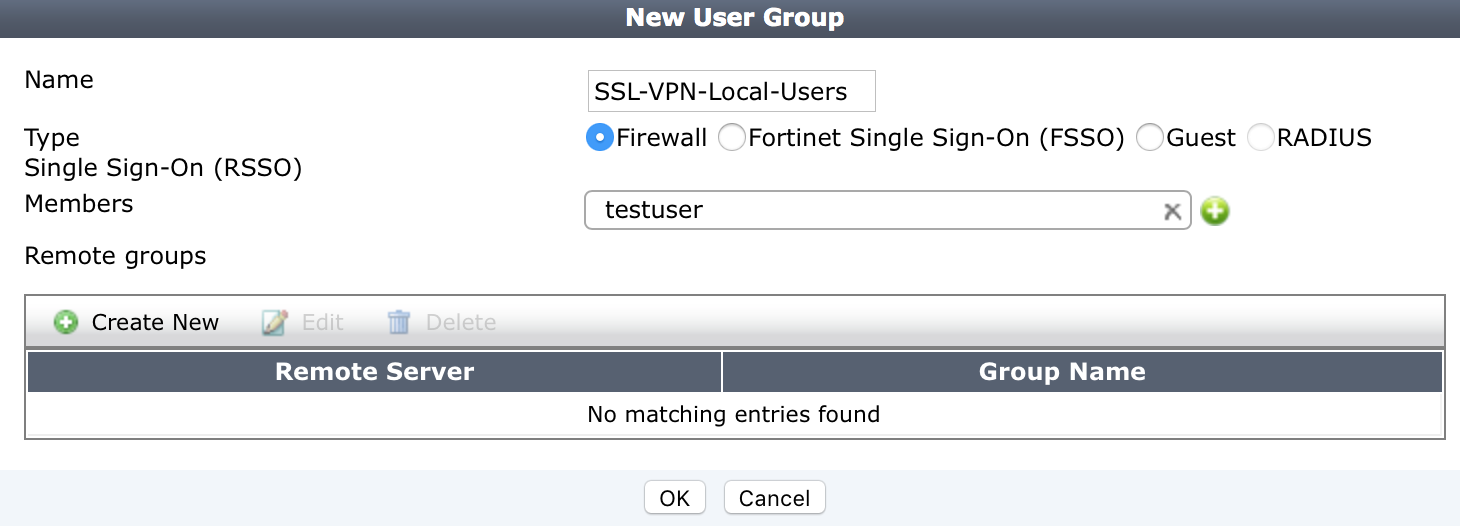
Step 2: Create a user group for SSL VPN users
- On your FortiGate go to User & Device –>User Groups
- Click Create New
- Name the group something meaningful, like SSL-VPN-Local-Users
- Add the user(s) created above and click OK
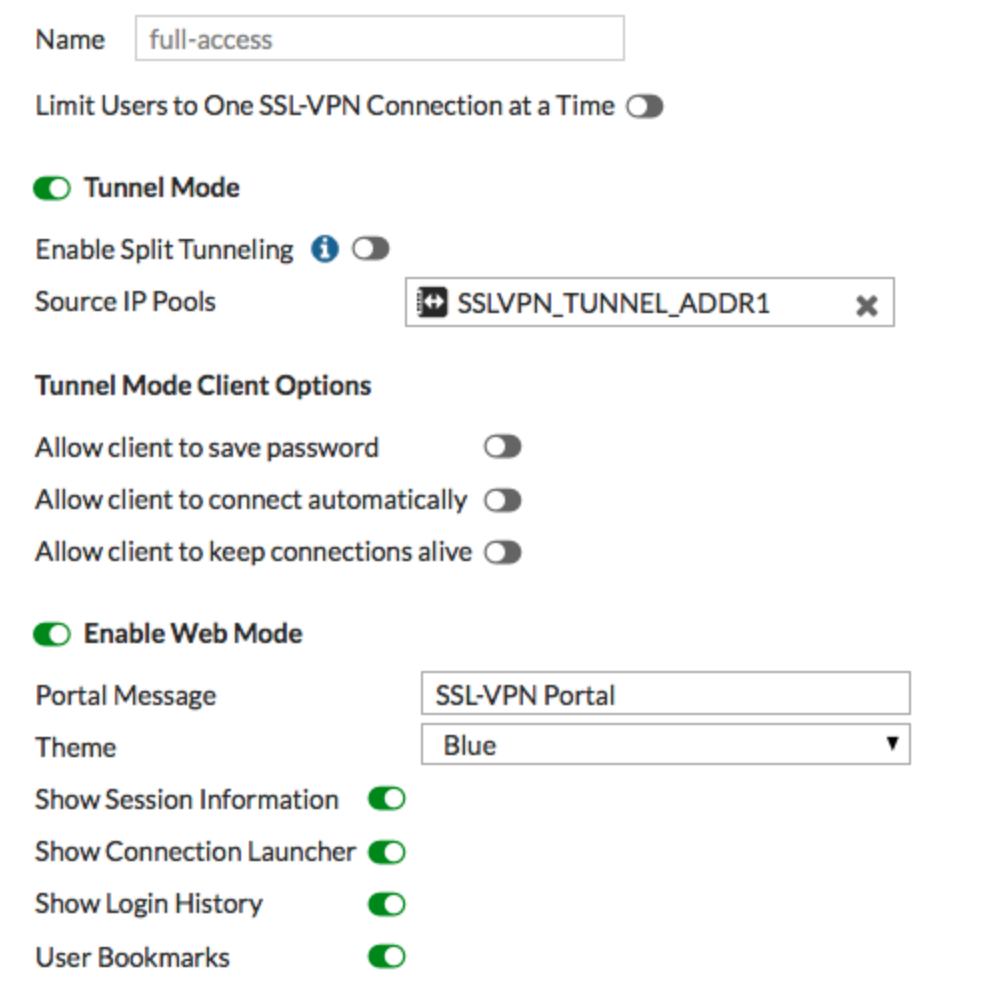
Step 3: Create a SSL VPN Portal for your remote users
- On your FortiGate go to VPN –>SSL-VPN Portals
- Edit the full-access portal. The full-access portal allows the use of tunnel mode and web mode.
- Make sure Enabled Split Tunneling is not selected, otherwise Internet traffic won’t go through the firewall.
- Set Source IP Pools to use the default IP range SSLVPN_TUNNEL-ADDR1 (or create your own address object that doesn’t conflict with another one and use that).
- (Optional) Under Predefined Bookmarks select create new to add a new bookmark. Bookmarks are used as links to internal resources. They can be used for the following types of resources:
- Citrix
- FTP
- HTTP/HTTPS
- Port Forward
- RDP
- SMB/CIFS
- SSH
- Telnet
- VNC
- Click OK to save
Step 4: Configure the SSL VPN tunnel mode
- On your FortiGate go to VPN –>SSL-VPN Settings
- Set the Listen on Interfaces to listen on your WAN interface(s)
- Set the Listen on Port to something other then 443 to avoid port conflicts. 10443 is an advised port to reduce potential conflicts
- Set Restrict Access to Allow Access from any host
- In this example the Fortinet_Factory certificate is shown as the server certificate. It’s highly recommended
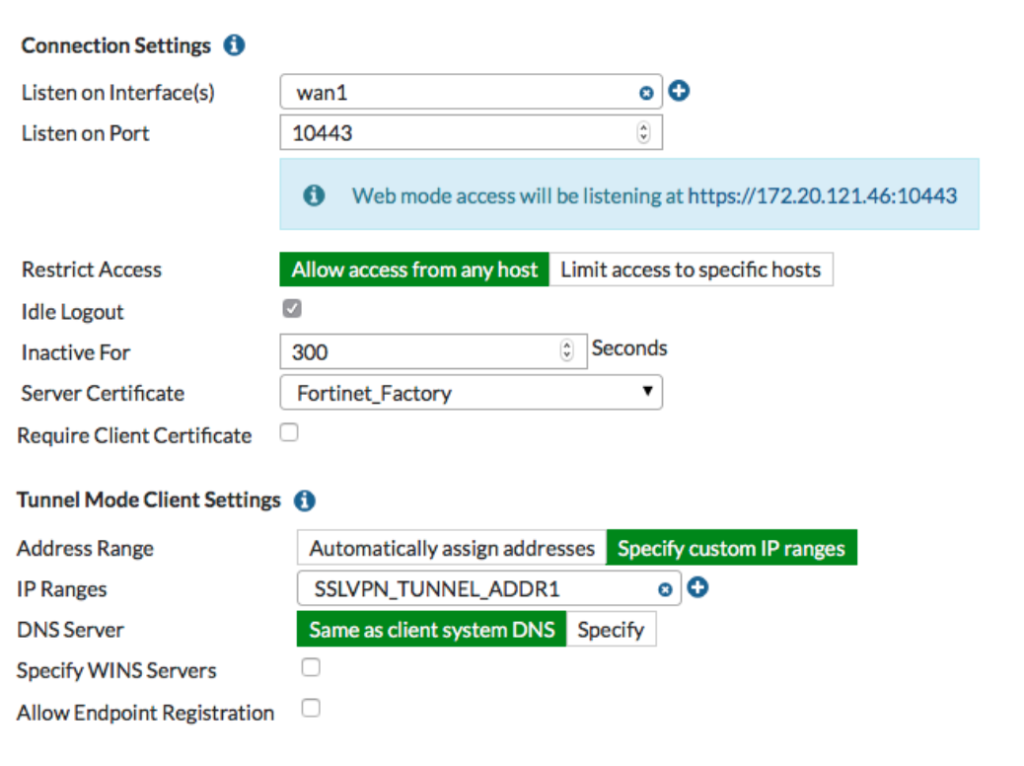
- In New Authentication/Portal Mapping, add the SSL-VPN-Local-Users group to the full-access portal and click OK
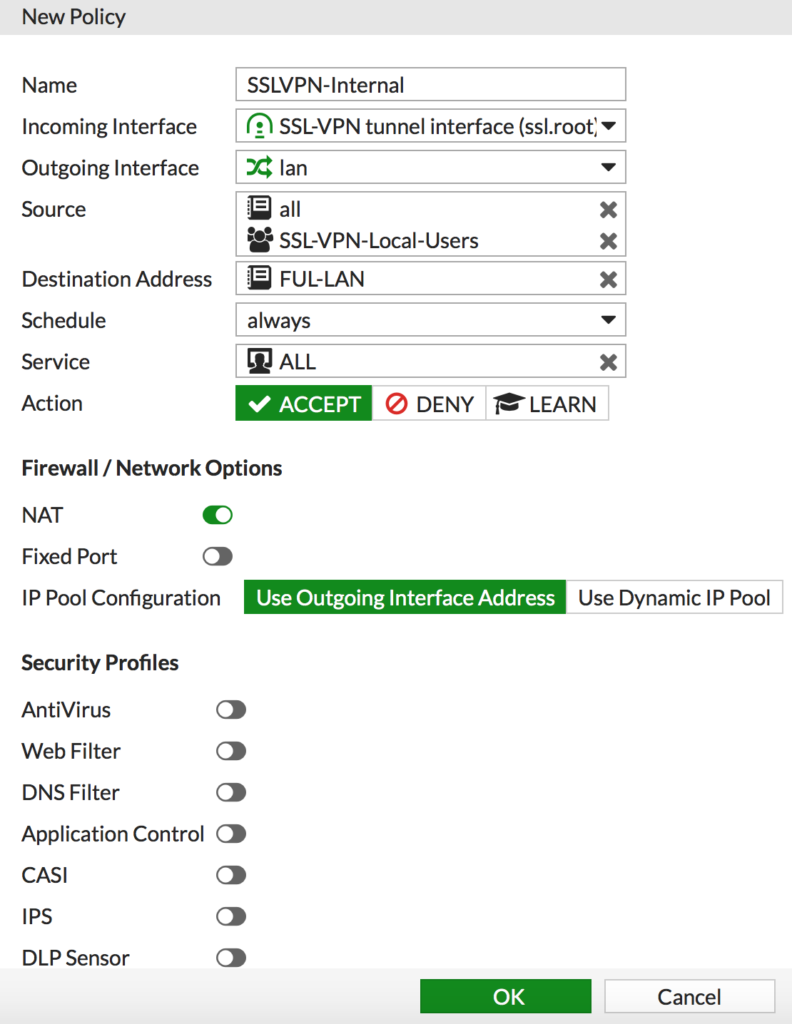
Step 5: Add security policies for access to the LAN
- On your FortiGate go to Policy & Objects –> IPv4
- Click Create new
- Give it a descriptive name like SSLVPN-Internal
- Set the Incoming interface to SSL-VPN tunnel interface
- Set the Outgoing Interface to lan
- Set the source to All (for addresses) AND SSL-VPN-Local-Users (for users), you need both
- Set the destination address for the address object of your local lan
- Set the service to All
- Enable NAT
- (Optional) Enable any security services you want enabled for this connection
- Click OK
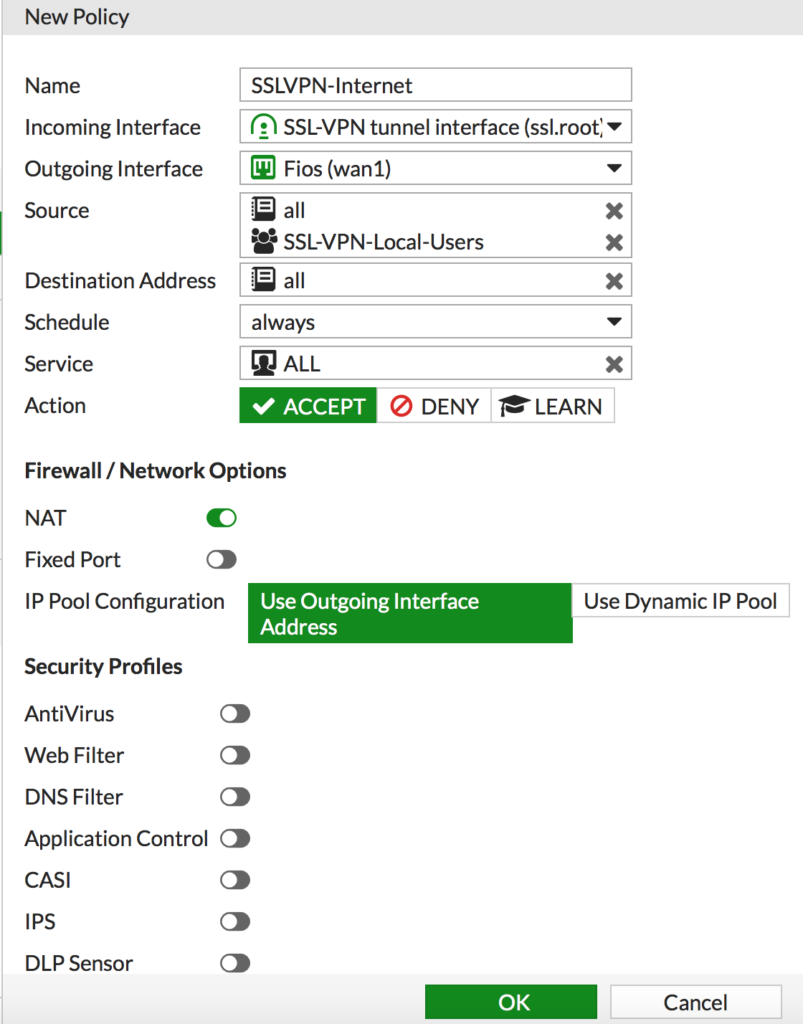
Step 6: Add another security policy to allow access to the Internet
- On your FortiGate go to Policy & Objects –> IPv4
- Click Create new
- Give it a descriptive name like SSLVPN-Internet
- Set the Incoming interface to SSL-VPN tunnel interface
- Set the Outgoing Interface to lan
- Set the source to All (for addresses) AND SSL-VPN-Local-Users (for users), you need both
- Set the destination address for the address object of your Internet connections
- Set the service to All
- Enable NAT
- (Optional) Enable any security services you want enabled for this connection
- Click OK
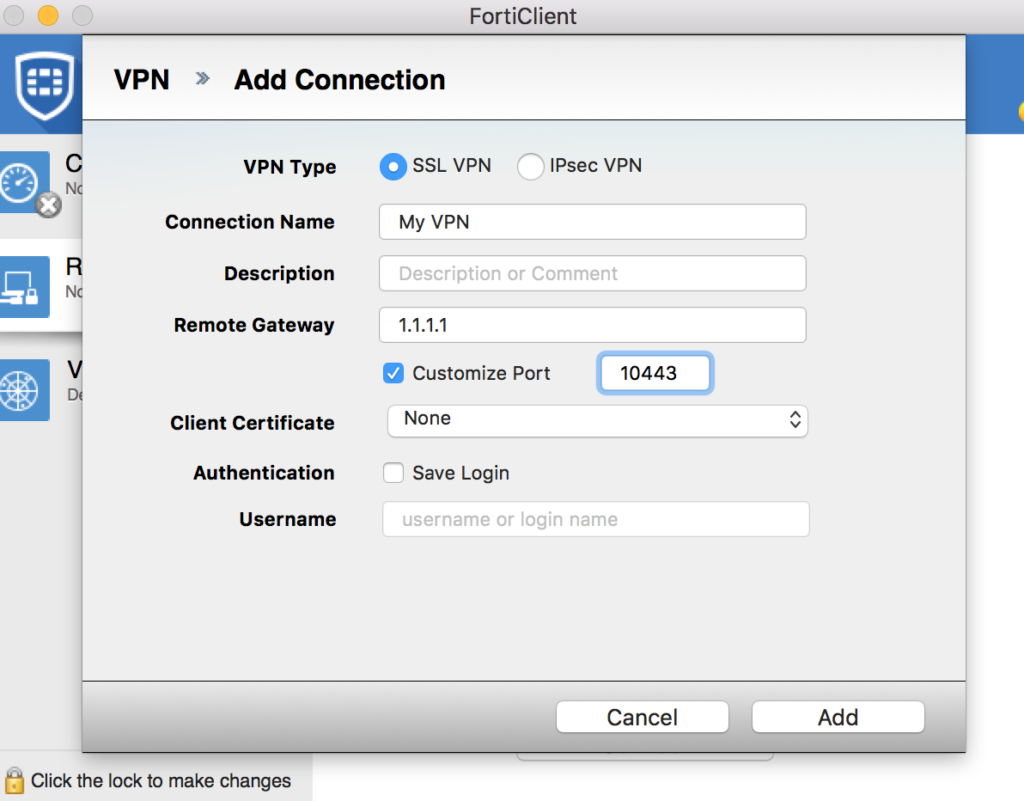
Step 7: Setup the VPN client
- If you haven’t already installed the FortiClient (the VPN client) download it from www.forticlient.com and install it
- Open the FortiClient program and go to the Remote Access tab
- Click Add a new connection
- Set the VPN Type to SSL VPN
- Give it a descriptive Connection Name
- Enter your devices public IP address in Remote Gateway
- Customize the port to what you set the portal too above
- Click Add
Step 8: Test!
- To connect with a web browser, point your browser to your device’s public IP and the port we set above. For example, https://1.1.1.1:10443/
- Enter your credentials and you should get access to the portal, giving you any shortcuts you created
- To connect with the FortiClient, start the FortiClient and go to the Remote Access tab. Enter you credentials and click Connect
Wrap up
It’s highly advised to not use the internal Fortinet certificate for production SSL VPN usage. It’s not secure and it’s not recognized by any browsers so your users will get certificate errors and you’ll get questions. Check out this post for adding a SSL Certificate to your VPN.
Also check out this post for adding FortiGate AD Authentication for SSL VPN v5.4
One thought on “FortiGate SSL VPN v5.4”
This website was… how do you say it? Relevant!! Finally I’ve found something that helped me. Many thanks!