Certificate Based Site to Site VPN
Site to Site VPN tunnels can be authenticated by using digital certificates instead of using pre-shared keys. With certificates, each peer gets a certificate from a centralized CA (certificate authority). When peers want to use IPsec they exchange the certificates to authenticate.
The biggest advantage of using certificate based VPN’s is they are easier to scale up. Let’s say you have a home office and 3 branch offices connected via site to site VPN’s, and these VPN’s are protected using traditional pre-shared keys. If you want to add another location, you will need another preshared key (since you shouldn’t be sharing keys between tunnels). This grows exponentially if you need sites to talk to each other as well and makes managing preshared keys quickly unmanageable.
With certificates, all firewalls/routers will trust the certificates that are signed by the CA.
Example:
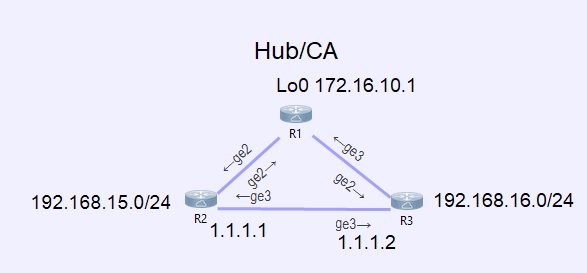
In this example, R1 is the hub and will act as the CA. R2 and R3 will register with R1 for their certificate and will have a site to site VPN between them, protecting the traffic between 192.168.15.0/24 and 192.168.16.0/24.
It’s assumed all 3 devices already have NTP sources setup, with certificates it’s critical to make sure time is synchronized!
First we setup the CA server on R1:
R1(config)#
interface loopback0
ip address 172.16.10.1 255.255.255.0
!
!Generate the crypto key
crypto key generate rsa modulous 1024 label cisco1
!
!enable the http server for registration
ip http server
!
!setup the PKI server
crypto pki server CA
database url nvram:
database level complete
issuer-name CN=r1 O=domain.com
grant auto
!
!bind the trustpoint
crypto pki trustpoint CA
rsakeypair cisco1
!
!start the PKI server
crypto pki server CA
no shut
!
Next configure R2 Peer:
R2(config)#
!generate the crypto key
crypto key generate rsa modulus 1024 label ciscor2
!
!Phase 1 – isakmp policy
crypto isakmp policy 10
encr 3des
auth rsa-sig
hash md5
group 2
!
!Phase 2 – ipsec transform set
crypto ipsec transform-set TS esp-3des esp-md5-hmac
mode tunnel
!
!Create an ACL for interesting traffic
ip access-list extended ACL
permit ip 192.168.15.0 0.0.0.255 192.168.16.0 0.0.0.255
!
!Create a crypto map to link parameters
crypto map S2S 10 ipsec-isakmp
set peer 1.1.1.2
set transform-set TS
match address ACL
reverse-route static
!
!bind the crypto map to an interface
interface g3
crypto map S2S
!
!PKI Authenticate and enroll
crypto pki trustpoint ciscor2
enrollment url http://172.16.10.1:80
ip-address ge2
subject-name CN=r2 O=domain.com
revocation-check none
source interface ge2
rsakeypair ciscor2
!
crypto pki authenticate ciscor2
!
crypto pki enroll ciscor2
Next configure R3 peer, it’s the same as R2 but with the names and IP’s modified:
R3(config)#
!generate the crypto key
crypto key generate rsa modulus 1024 label ciscor3
!
!Phase 1 – isakmp policy
crypto isakmp policy 10
encr 3des
auth rsa-sig
hash md5
group 2
!
!Phase 2 – ipsec transform set
crypto ipsec transform-set TS esp-3des esp-md5-hmac
mode tunnel
!
!Create an ACL for interesting traffic
ip access-list extended ACL
permit ip 192.168.16.0 0.0.0.255 192.168.15.0 0.0.0.255
!
!Create a crypto map to link parameters
crypto map S2S 10 ipsec-isakmp
set peer 1.1.1.1
set transform-set TS
match address ACL
reverse-route static
!
!bind the crypto map to an interface
interface g3
crypto map S2S
!
!PKI Authenticate and enroll
crypto pki trustpoint ciscor3
enrollment url http://172.16.10.1:80
ip-address ge2
subject-name CN=r2 O=domain.com
revocation-check none
source interface ge2
rsakeypair ciscor3
!
crypto pki authenticate ciscor3
!
crypto pki enroll ciscor3
That’s all there is to it! You can verify it by doing a show crypto isakmp sa